Getting started with Selenide
📅 05 Apr 2020 🕑 6 min read
Photo by Denys Nevozhai on Unsplash
Today we are talking about how to create a simple application based on selenide framework.
Show me the code!©
Above all, the selenide framework is a wrapper of selenium framework with a more convenient API. Very often it is used to test UI. However, there is another way of using selenide. Recently, I have faced that our partner did not provide any API except UI panel. It was very sad news for me because I have to scope with that strict.
Within bounds of this task, I had to make a process of getting some reports automatic. The first thing which came to my mind is using selenium or something like that. Unfortunately, selenium framework has quite rigid and cumbersome API and I had a look at selenide. Otherwise, work with it seems to be more enjoyable. It has fluent API and simple and clear work mechanics.
The first step is adding selenide to our dependency manager. In this article we use apache maven.
<dependency>
    <groupId>com.codeborne</groupId>
    <artifactId>selenide</artifactId>
    <version>5.2.4</version>
</dependency>
Next step is to implement some business logic. In this example, we create a program, which would enter LinkedIn.com and accept all friend requests. As you can see, it was pretty trivial and not rocket science.
The code below does what we want to do.
First of all, we need to login to the site. Method login does it.
private static void login(String username, String password) {
        open("http://www.linkedin.com");
        $$(By.tagName("a"))
                .filter(attribute("data-tracking-control-name", "guest_homepage-basic_nav-header-signin"))
                .first()
                .waitUntil(appear, TimeUnit.SECONDS.toMillis(30))
                .click();

        $(By.id("username")).setValue(username);
        $(By.id("password")).setValue(password);

        $$(By.tagName("button"))
                .filter(text("Sign in"))
                .first()
                .click();
}
Then we need to go to a page «My network» and find all requests there and accept them. According to name, the method acceptRequests does what we expect:
private static int acceptRequests() {
        $(By.id("mynetwork-tab-icon")).click();

        $(By.className("mn-community-summary")).waitUntil(appear, TimeUnit.SECONDS.toMillis(10));

        int acceptedRequests = 0;
        while (!Thread.currentThread().isInterrupted()) {
            ElementsCollection elements = $$(By.tagName("button"))
                    .filter(attribute("data-control-name", "accept"));
            if (elements.isEmpty())
                break;

            elements.first().click();
            screenshot("page-" + acceptedRequests);
            refresh();
            acceptedRequests++;
        }

        return acceptedRequests;
}
In addition, we have to create a web driver. A web driver provides some API for working with a web browser. Almost every popular browser has own web driver implementation. However, we use a remote web driver. I will explain why we do it later.
@SneakyThrows
private static WebDriver initWebDriver(String seleniumUrl){
        Configuration.timeout = TimeUnit.SECONDS.toMillis(10);
        Configuration.reportsFolder = Files.createTempDirectory("selenide-build").toAbsolutePath().toString();

        ChromeOptions chromeOptions = new ChromeOptions();
        chromeOptions.setExperimentalOption("useAutomationExtension", false);
        chromeOptions.addArguments(
                "disable-infobars",
                "--disable-extensions",
                "--disable-dev-shm-usage",
                "--no-sandbox",
                "--incognito",
                "--window-size=1920,1080",
                "--headless",
                "--disable-gpu",
                "--ignore-certificate-errors");

        DesiredCapabilities capabilities = DesiredCapabilities.chrome();
        capabilities.setCapability(ChromeOptions.CAPABILITY, chromeOptions);
        capabilities.setCapability(CapabilityType.UNEXPECTED_ALERT_BEHAVIOUR, UnexpectedAlertBehaviour.ACCEPT);
        WebDriver driver = new RemoteWebDriver(new URL(seleniumUrl), capabilities);
        WebDriverRunner.setWebDriver(driver);
        return driver;
}
How it works?
For sure, we do not run our app outside a docker container. In order to do it, we need a docker image. I have chosen the official selenium docker image , you can choose what you wish. This docker image contains a chrome browser and a web driver for working with this browser.
I feel I have to give more details about how it works. Have a look at the picture below.
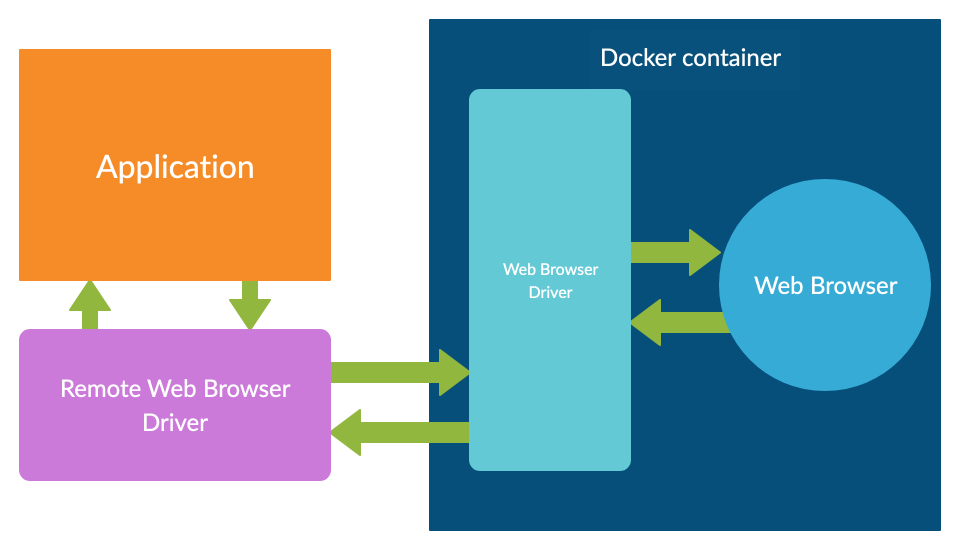
This diagram shows how we work with a chrome browser. There are several elements of an interaction chain. On the client-side (our program) we use remote driver API. Apparently, a remote driver connects to a chrome driver. A chrome driver is provided by browser maintainers so it knows exactly how to deal with a chrome browser.
You can ask me: «Why it’s so difficult?». I agree with you. On the face of it, this architecture is quite overwhelmed, but there are several reasons to do it. We use a remote browser because it lets us connect to a browser running on a docker container. Moreover, this approach has some pros. For instance, we want to use a browser which does not have a version for our target platform. (A target platform is Linux or Mac OS, but we want to use Microsoft Edge Browser located on a remote host)
Run app and enjoy
The last step is to run our application and see a result of its work. In order to do it, we should run the docker image:
$ docker run -d -p 4444:4444 selenium/standalone-chrome
$ mvn exec:java -Dexec.args="--username <your_username> --password <your_password>"
I hope this topic was useful to you 😉. The source code is below.
![]()